Pong
Before we get started, this particular tutorial will be aimed towards beginners (both in terms of general programming knowledge as well as the LÖVE framework & Lua), if you're not a beginner, feel free to skim through!
Now, let's get started!
First of all, create a folder for our Pong game (Note: There is a link to the repository here so you can follow along and allow you to debug any errors you may come across). In that folder, create a file called main.lua. This is the entry point to our game (and in this tutorial, the entire game) that LÖVE will look for when it runs.
To test everything is running so far, navigate to your directory (either in IDE/text editor, or a terminal/command prompt) and run LÖVE. If you're using VSCode with the LÖVE plugin, you should be able to use Alt+L, alternatively you can add LÖVE to your path (see the 'Running Games' section here), and type love . in your terminal.
You should see a plain black screen. Success!
LÖVE built-in functions
There are several functions that LÖVE calls automatically, with no input from us. We'll see more as we progress through the tutorials, but the 3 main ones are:
love.load - This is called once when the game is run
love.update - This gets called as often as possible (up to 1000 times per second) and is where the majority of our logic will live.
love.draw - This gets called right after love.update, and is responsible for drawing shapes and images to the screen.
Since we'll use these 3 functions for every game we'll build, go ahead and add those functions above you your main.lua file as shown below. (I'll explain the dt in a later section):
function love.load()

end

function love.update(dt)

end

function love.draw()

end
Drawing the ball
Now that we've got the skeleton of our game set up, let's actually add something that in some way resembles a game. Let's start by drawing the ball at the centre of the screen.
In your love.draw function, add the following code:
love.graphics.circle('fill', love.graphics.getWidth() / 2, love.graphics.getHeight() / 2, 5)You should see the ball drawn as a white circle in the centre of the screen.

If you're using the LÖVE extension in VSCode, or you looking at the API reference here, you'll see that love.graphics.circle takes 4 parameters. A draw mode (whether we want an outline 'line', or a solid circle 'fill'), x and y positions of the centre, as well as the circle's radius.
Naturally, the x and y positions will vary once the game starts, so let's extract those values to variables, as well as the ball radius.
In your love.load function, add the following:
ballX = love.graphics.getWidth() / 2
ballY = love.graphics.getHeight() / 2
ballRad = 5
And update love.draw as follows:
love.graphics.circle('fill', ballX, ballY, ballRad)If you run the game again, nothing will have changed, but we're now ready to move our ball. Let's give our ball a speed, in love.load, add the following variable:
ballSpeed = 100And in love.update, add the following:
function love.update(dt)
  ballX = ballX + ballSpeed * dt
end
A few things to point out here, first of all, our ball is moving, which is great! Secondly, if you're experienced in other programming languages, you might be thinking why we're not writing:
ballX += ballSpeed * dtUnary operators such as +=, -=, ++, --, *=, /= etc. are not supported in Lua.
Finally, what is that dt doing? And how does it get there?
dt is short for delta time, that is the time between the previous call to love.update and the current one. As mentioned in the beginning, love.update and love.draw get called as often as possible. If we simply added the ball's speed to its current position every time we called update, the speed of the ball would differ depending on how powerful your computer is. By multiplying the speed by the time between frames, we can ensure that the speed is consistent whether your game is running at 1000 frames per second, or 30.
Keeping the ball within the screen
It's great that we've got our ball moving, until it moves off screen into oblivion that is. So let's confine our ball to the screen (at least until we get our paddles created).
In order to do this, we'll confine our ball's x position to stay between 0 and the screen width. We can do this by adding the following code to our update function:
if ballX < 0 then
  ballX = 0
  ballSpeed = -ballSpeed
end
if ballX > love.graphics.getWidth() then
  ballX = love.graphics.getWidth()
  ballSpeed = -ballSpeed
end
As well as flipping the speed value, we also need to place our ball back onto the boundary of our screen. If we did not do this, it's possible that the ball is so far beyond the edge of the screen, that when we flip the speed, it doesn't manage to get back into view. It will then continue to alternate it's direction for eternity, beyond the viewport.
In order to see this in action, comment out the lines setting ballX, and add the following line to our love.draw function
love.graphics.print(string.format(\"%.0f\", ballX), 10, 10)This will print the ball's x position as an integer to top-left corner of your screen. Try increasing the value of ballSpeed and watch as the ball starts to move so fast that it gets trapped outside of the screen.
Another dimension, another dimension
Right now we have our ball moving from left to right, and back again. Not exactly going to make the most exciting competitive experience! So let's add a y component to our ball's movement. In the load.load function, replace the ballSpeed variable with the following:
ballSpeedX, ballSpeedY = love.math.random(100, 200), love.math.random(100, 200)As you can see, in Lua we can assign multiple variables at the same time. Here we're setting both the x and y components to be a random value between 100 & 200 (as we're multiplying by dt, these values correspond to the speed in terms of number of pixels per second).
Now, let's actually use these new values. In our love.update function, replace all references to ballSpeed to ballSpeedX, and add the following line:
ballY = ballY + ballSpeedY * dtYou'll see the ball will now move in a random direction starting from the centre of the screen.
Let's keep the ball in bounds with its y position. Similar to what we've done with the x position, add the following to the end of our update function:
if ballY < 0 then
    ballY = 0
    ballSpeedY = -ballSpeedY
end
if ballY > love.graphics.getHeight() then
    ballY = love.graphics.getHeight()
    ballSpeedY = -ballSpeedY
end
You'll see the ball now bounces off all 4 sides of the screen. Progress!
Paddles
Similarly to the ball, we'll add the variables for size and position of the paddles in our love.load function:
paddleWidth = 10
paddleHeight = 80
paddle1X = 30
paddle1Y = 10
paddle2X = love.graphics.getWidth() - paddle1X - paddleWidth
paddle2Y = 10
And draw them in the love.draw function by adding the following lines:
love.graphics.rectangle('fill', paddle1X, paddle1Y, paddleWidth, paddleHeight)
love.graphics.rectangle('fill', paddle2X, paddle2Y, paddleWidth, paddleHeight)
Note that the love.graphics.rectangle function takes in a draw mode (either fill or line), x, y, width and height. The x and y parameters refer to the upper left corner, as shown in this image:
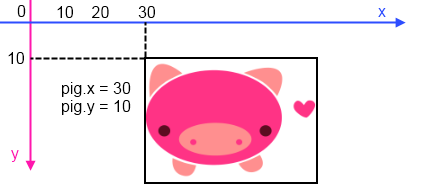
This is also why we set paddle 2's x value to be love.graphics.getWidth() - paddle1X - paddleWidth. We start from the right side of the screen (love.graphics.getWidth()), then move left by the paddleWidth plus paddle 1's distance from the left edge of the screen.
You should see the paddles drawn at both sides of the screen.

Taking control
Now it's time to allow our players to move the paddles. First we'll add a speed variable for the paddles (like the ball, this will be in pixels per second). Add the following to your love.load function:
paddleSpeed = 300In our love.update function, we'll make use of the love.keyboard.isDown function. This function takes in a keyboard character as a parameter, and returns true if that key is down this frame, false if not. We'll use W/S and Up Arrow/Down Arrow for player 1 and player 2's up and down controls respectively. Add the following to your love.update:
if love.keyboard.isDown('w') then
    paddle1Y = paddle1Y - paddleSpeed * dt
end
if love.keyboard.isDown('s') then
    paddle1Y = paddle1Y + paddleSpeed * dt
end
if love.keyboard.isDown('up') then
    paddle2Y = paddle2Y - paddleSpeed * dt
end
if love.keyboard.isDown('down') then
    paddle2Y = paddle2Y + paddleSpeed * dt
end
This should be relatively straightforward to understand. Remember that down is positive in the y axis, and that we must remember to multiply our speed by dt.
However, one problem that we have, is that our paddles can move off screen. In order to prevent this we'll use a relatively standard function called clamp. This is a common function in many programming languages' math libraries, Lua is not one of those libraries. Thankfully, it's a very simple function to write. Add this function our main.lua file (where it's added doesn't matter, I'd recommend keeping utility functions like this at the bottom of the file)
function math.clamp(value, min, max)
    return math.max(math.min(value, max), min)
end
By calling the function math.clamp, we've added it to the existing math library. The math library is simply a table, and we're adding the clamp property with this function as it's value. This isn't incredibly important to understand at the moment, we'll go over tables in much greater detail in the next tutorial.
As you can see, the clamp function takes in the value we want clamped (in this case, the y value of our paddle), a minimum value, and a maximum value. First we take the minimum of the value we pass in and the max value. Then take the maximum of that value and the min value.
You could of course write something like:
function math.clamp(value, min, max)
    if value > max then
        return max
    elseif value < min then
        return min
    else
        return value
    end
end
Feel free to use this version if it is more straightforward to understand.
And now to put our clamp function to use. Simply add the following lines to our love.update function and you'll see that our paddles are now constrained to the screen area.
paddle1Y = math.clamp(paddle1Y, 0, love.graphics.getHeight() - paddleHeight)
paddle2Y = math.clamp(paddle2Y, 0, love.graphics.getHeight() - paddleHeight)
Again, the love.graphics.getHeight() - paddleHeight value is used because the y component of our rectangle's origin is at the top, therefore the largest our y value should be is the height of the screen, minus the height of the paddle.
Handling Collisions
Handling of collisions can be broken down into 2 steps, collision detection and collision resolution. Collision detection methods will tell us whether or not there is a collision between two bodies, collision resolution methods will tell us what to two with the two colliding bodies.
Collision detection
For our collision detection, we'll use an algorithm called Axis-Aligned Bounding Box (AABB for short).
We will approximate the ball as a square (since almost all collisions will be on the top-most, bottom-most, left-most or right-most point of the circle, this is an acceptable assumption).
This algorithm takes in the information for two squares/rectangles. As the name implies, for this algorithm it is necessary that they both have the same rotation (their axes are aligned), which is the case here.
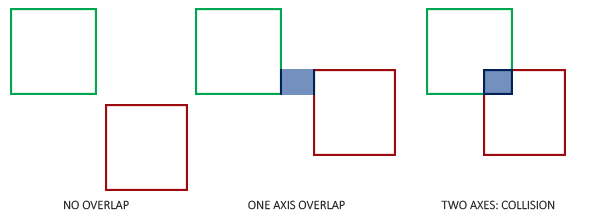
This algorithm will return true (meaning the two bodies are colliding) if the following conditions are met:
- The left-most edge of BoxA is to the left of the right-most edge of BoxB
- The right-most edge of BoxA is to the right of the left-most edge of BoxB
- The top-most edge of BoxA is above the bottom-most edge of BoxB
- The bottom-most edge of BoxA is below the top-most edge of BoxB
This is better shown than explained, below is a simple diagram showing the conditions discussed above. I have also created a small LÖVE interactive demo which you can find here.
Collision Resolution
Now that we have the ability to detect when a collision has occurred, we must decide what to do with our colliding bodies. In this instance, the answer is relatively similar, we reverse the direction of the x component of the ball's velocity. Similar to what we've previously done when dealing with the ball colliding with the edge of the screen, we will also reset the ball's position to the leading edge of the paddle which it has collided with.
The entire collision handling code (detection and resolution) is contained in the function below:
function checkCollisions()
    if
        ballX < paddle1X + paddleWidth and
        ballX + ballRad > paddle1X and
        ballY < paddle1Y + paddleHeight and
        ballY + ballRad > paddle1Y
    then
        ballX = paddle1X + paddleWidth
        ballSpeedX = -ballSpeedX
    end

    if
        ballX < paddle2X + paddleWidth and
        ballX + ballRad > paddle2X and
        ballY < paddle2Y + paddleHeight and
        ballY + ballRad > paddle2Y
    then
        ballX = paddle2X - ballRad
        ballSpeedX = -ballSpeedX
    end
end
Hopefully the above code should be quite simple to understand, the checks basically take the form of:
if
    collisionDetectionCode
then
    collisionResolutionCode
end
For both paddles.
We'll add a call to this checkCollisions() function at the end of our update() function so that the collisions are checked every frame.
If you run your game now, the ball/paddle collisions should be functioning.
Scoring
Naturally, a competitive game is not much fun if we can't see who's winning. So let's add the logic for scoring and a basic display to our game.
First of all let's tackle the displaying of scores.
Add the following variables to your love.load function to keep track of the scores:
    player1Score = 0
    player2Score = 0
And the following to your love.draw function:
love.graphics.print('Player 1: ' .. player1Score, 10, 10)
love.graphics.print('Player 2: ' .. player2Score, love.graphics.getWidth() - 75, 10)
The love.graphics.print function takes in the following parameters (text, xPosition, yPosition).
(The .. operator concatenates two strings.)
Your screen should now look like this:

The logic for detecting when we should increment the score already exists, it's the code that is currently being used for determining when the ball bounces off the left or right edges of the screen.
Instead of simply bouncing the ball of the left/right edges of the screen, we will instead increment the relevant player's score, and reset the ball to the centre of the screen.
First, we'll create the resetBall function:
function resetBall()
    ballX = love.graphics.getWidth() / 2
    ballY = love.graphics.getHeight() / 2
    ballSpeedX, ballSpeedY = love.math.random(100, 200), love.math.random(100, 200)
end
You'll notice we use the same 3 lines in our love.load function, feel free to replace these lines with resetBall().
Next, we'll modify our code that deals with the ball reaching the sides of the screen. In your love.update function, change the following code:
if ballX + ballRad < 0 then
    ballX = 0
    ballSpeedX = -ballSpeedX
end
if ballX > love.graphics.getWidth() then
    ballX = love.graphics.getWidth()
    ballSpeedX = -ballSpeedX
end
To this:
if ballX + ballRad < 0 then
    resetBall()
    player2Score = player2Score + 1
end
if ballX > love.graphics.getWidth() then
    resetBall()
    player1Score = player1Score + 1
end
At this point, our scoring system is up and running and the ball resets to the centre with a new random velocity each time.
Managing game state
At this point, we've added all of the functionality required for our core game loop. However, the way in which the game starts right away when we open it, restarts immediately after a point is scored and has no end is not great in terms of a user experience. Let's fix this using a series of states that the game can exist in.
Below is a diagram of showing the states our game can run in, as well as the possible transitions between these states.

Currently, we have the 'Main game state' up and running, so let's rename our love.update and love.draw functions to updateMainGameState and drawMainGameState. Now recreate the love.update and love.draw functions, and call the respective main game state functions from them, like so:
function love.update(dt)
    updateMainGameState(dt)
end

function love.draw()
    drawMainGameState()
end
If you run your game now, you'll see that nothing has changed. A positive step in rewriting our code!
Of course, the whole purpose of adding states is to allow us to change which functions get called in our update & draw methods. So, in our love.load function, let's create a new variable:
currentState = 'mainGame'And update our update & draw functions like so:
function love.update(dt)
    if currentState == 'mainGame' then
        updateMainGameState(dt)
    end
end

function love.draw()
    if currentState == 'mainGame' then
        drawMainGameState()
    end
end
Again, try running your game to ensure no behaviour has changed.
Now, let's create the corresponding functions for the main menu, ready and end game states.
The main menu, ready and end game states will simply prompt the user for input to move to the next state. As such, they won't need an update function. We'll create basic draw functions for them to indicate that the user needs to press a button to proceed.
function drawMainMenuState()
    love.graphics.print('Main menu\nPress space to begin match', 10, 10)
end
function drawReadyState()
    love.graphics.print('Ready?\nPress space to serve', 10, 10)
end
function drawEndGameState()
    love.graphics.print('Game Over\nPress space to return to main menu', 10, 10)
end
And our love.draw function function should be updated accordingly:
function love.draw()
    if currentState == 'mainMenu' then
        drawMainMenuState()
    elseif currentState == 'ready' then
        drawReadyState()
    elseif currentState == 'mainGame' then
        drawMainGameState()
    elseif currentState == 'endGame' then
        drawEndGameState()
    end
end
Naturally, we'll want to start at the main menu, so let's change our initial state in love.load to:
currentState = 'mainMenu'Currently, we have no way to transition between our states, as described in the draw functions, we'll use the spacebar to navigate between events. LÖVE calls a function every time a key is pressed, fittingly called love.keypressed. This passes in the key that was pressed as a parameter. In order to handle the input for transitioning between states, let's add the following:
function love.keypressed(key)
    if key == 'space' then
        if currentState == 'mainMenu' then
            currentState = 'ready'
        elseif currentState == 'ready' then
            currentState = 'mainGame'
        elseif currentState == 'endGame' then
            currentState = 'mainMenu'
        end
    end
end
And as I'm sure you're sick of having to click the close button on the window every time you want to exit the game, feel free to add this block in the love.keypressed function to allow you to close the game by pressing the escape key:
if key == 'escape' then
    love.event.quit()
end
Now that we've handled the state transition from main menu to ready, from ready to main game, and from end game back to the main menu. All that is left to implement is to add the transition from main game, back to ready. This should occur after a point is scored so the ball doesn't immediately get served again. All we need to do is to change the current state in the block of code executed when a point is scored, as below:
if ballX + ballRad < 0 then
    resetBall()
    player2Score = player2Score + 1
    currentState = 'ready'
end
if ballX > love.graphics.getWidth() then
    resetBall()
    player1Score = player1Score + 1
    currentState = 'ready'
end
One thing that should be noted at this point, is that the ball is always served in the positive x direction. In order to make this more fair, we can give the ball a 50:50 chance of which direction it will go in. We can make use of the love.math.random function, which if called with no parameters, will return a number between 0 and 1. Add the following block to the resetBall function after we set the ball's x and y components of velocity:
if love.math.random() > 0.5 then
    ballSpeedX = ballSpeedX * -1
end
Another improvement that could be made in this function is to centre the paddles. Remove the:
paddle1Y = 10
paddle2Y = 10
Assignments in love.load and instead, add the following to resetBall instead:
paddle1Y = love.graphics.getHeight() / 2 - paddleHeight
paddle2Y = love.graphics.getHeight() / 2 - paddleHeight
Be sure to have declared the paddleHeight variable prior to calling resetBall otherwise you'll see an error that paddleHeight has not yet been initialised and is therefore null. At this point it is also wise to rename the resetBall function to something more generic, such as resetMainGameState.
The end
Finally, all is left to do is to end the game. Add a maxScore variable to love.load with the winning score of your choice, and when a point is scored, check if the scoring player's score is greater than maxScore, moving to the game over state if so:
    if ballX + ballRad < 0 then
        resetMainGameState()
        player2Score = player2Score + 1
        if player2Score >= maxScore then
            currentState = 'endGame'
        else
            currentState = 'ready'
        end
    end
    if ballX > love.graphics.getWidth() then
        resetMainGameState()
        player1Score = player1Score + 1
        if player1Score >= maxScore then
            currentState = 'endGame'
        else
            currentState = 'ready'
        end
    end
A small finishing touch is to display the winning player on the game over screen. This can be done by setting a gameOverMessage variable in love.load, setting it in the above code, and passing it to the drawEndGameState's print function:
if player2Score > maxScore then
    currentState = 'endGame'
    gameOverMessage = 'Player 2 wins!\nPress space to return to main menu'
else
    currentState = 'ready'
end
function drawEndGameState()
love.graphics.print(gameOverMessage, 10, 10)
endAnd with that, we have a fully functioning game of Pong. Well done on getting to the end and hopefully you've got a good grasp on the basics of game development. In our next tutorial we'll be looking at the Lua language in much greater detail, including many of the features that differentiate it from other scripting languages, as well as improved collision logic, and even a little bit of procedural level generation.
In the meantime, feel free to play around with the code you've written, and maybe make some improvements. How about increasing the ball's speed every time it hits a paddle? Or ensuring it is always sent to the previous scoring player's side after a point is scored?
Full code:
function love.load()
currentState = 'mainMenu'
ballRad = 5
paddleWidth = 10
paddleHeight = 80
resetMainGameState()
paddleSpeed = 300
paddle1X = 30
player1Score = 0
paddle2X = love.graphics.getWidth() - paddle1X - paddleWidth
player2Score = 0
maxScore = 5
gameOverMessage = ''
end
function love.update(dt)
if currentState == 'mainGame' then
updateMainGameState(dt)
end
end
function love.draw()
if currentState == 'mainMenu' then
drawMainMenuState()
elseif currentState == 'ready' then
drawReadyState()
elseif currentState == 'mainGame' then
drawMainGameState()
elseif currentState == 'endGame' then
drawEndGameState()
end
end
function love.keypressed(key)
if key == 'space' then
if currentState == 'mainMenu' then
currentState = 'ready'
elseif currentState == 'ready' then
currentState = 'mainGame'
elseif currentState == 'endGame' then
currentState = 'mainMenu'
end
end
if key == 'escape' then
love.event.quit()
end
end
function updateMainGameState(dt)
ballX = ballX + ballSpeedX * dt
ballY = ballY + ballSpeedY * dt
if ballX + ballRad < 0 then
resetMainGameState()
player2Score = player2Score + 1
if player2Score >= maxScore then
currentState = 'endGame'
gameOverMessage = 'Player 2 wins!\nPress space to return to main menu'
else
currentState = 'ready'
end
end
if ballX > love.graphics.getWidth() then
resetMainGameState()
player1Score = player1Score + 1
if player1Score >= maxScore then
currentState = 'endGame'
gameOverMessage = 'Player 1 wins!\nPress space to return to main menu'
else
currentState = 'ready'
end
end
if ballY < 0 then
ballY = 0
ballSpeedY = -ballSpeedY
end
if ballY > love.graphics.getHeight() then
ballY = love.graphics.getHeight()
ballSpeedY = -ballSpeedY
end
if love.keyboard.isDown('w') then
paddle1Y = paddle1Y - paddleSpeed * dt
end
if love.keyboard.isDown('s') then
paddle1Y = paddle1Y + paddleSpeed * dt
end
if love.keyboard.isDown('up') then
paddle2Y = paddle2Y - paddleSpeed * dt
end
if love.keyboard.isDown('down') then
paddle2Y = paddle2Y + paddleSpeed * dt
end
paddle1Y = math.clamp(paddle1Y, 0, love.graphics.getHeight() - paddleHeight)
paddle2Y = math.clamp(paddle2Y, 0, love.graphics.getHeight() - paddleHeight)
checkCollisions()
end
function drawMainGameState()
love.graphics.circle('fill', ballX, ballY, ballRad)
love.graphics.rectangle('fill', paddle1X, paddle1Y, paddleWidth, paddleHeight)
love.graphics.rectangle('fill', paddle2X, paddle2Y, paddleWidth, paddleHeight)
love.graphics.print('Player 1: ' .. player1Score, 10, 10)
love.graphics.print('Player 2: ' .. player2Score, love.graphics.getWidth() - 75, 10)
end
function drawMainMenuState()
love.graphics.print('Main menu\nPress space to begin match', 10, 10)
end
function drawReadyState()
love.graphics.print('Ready?\nPress space to serve', 10, 10)
end
function drawEndGameState()
    love.graphics.print(gameOverMessage, 10, 10)
end
function math.clamp(value, min, max)
return math.max(math.min(value, max), min)
end
function checkCollisions()
if
ballX < paddle1X + paddleWidth and
ballX + ballRad > paddle1X and
ballY < paddle1Y + paddleHeight and
ballY + ballRad > paddle1Y
then
ballX = paddle1X + paddleWidth
ballSpeedX = -ballSpeedX
end
if
ballX < paddle2X + paddleWidth and
ballX + ballRad > paddle2X and
ballY < paddle2Y + paddleHeight and
ballY + ballRad > paddle2Y
then
ballX = paddle2X - ballRad
ballSpeedX = -ballSpeedX
end
end
function resetMainGameState()
ballX = love.graphics.getWidth() / 2
ballY = love.graphics.getHeight() / 2
ballSpeedX, ballSpeedY = love.math.random(100, 200), love.math.random(100, 200)
if love.math.random() > 0.5 then
ballSpeedX = ballSpeedX * -1
end
paddle1Y = love.graphics.getHeight() / 2 - paddleHeight
paddle2Y = love.graphics.getHeight() / 2 - paddleHeight
end